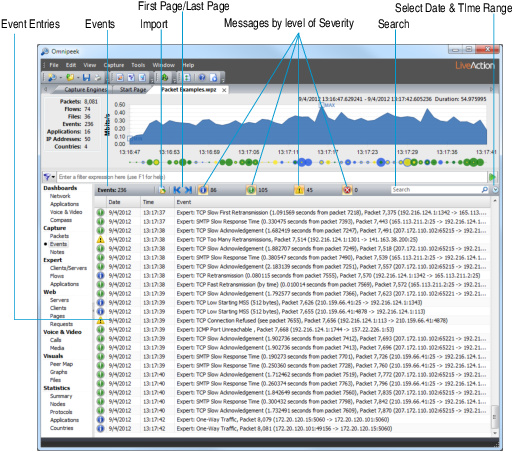
Omnipeek capture events
To view the Omnipeek capture window events, select the Events view in the capture window.
NOTE: The Events view of a capture window has a limit defined in terms of number of events allowed. You can select or enter the maximum (Max) number of log messages allowed in the log, and then select or enter the number (Adjust) of log messages to delete once the number of log messages reaches the maximum. The oldest messages are deleted first. To change the default log size in new capture windows, on the menu, click …. The Options dialog appears. See Configuring the Options dialog.

The parts of the Events view of an Omnipeek capture window are identified below:
• Events: Displays the total number of events.
• Import: Allows you to import events from supported files. Typically, this is most often used for importing security events from a supported IDS/IPS, such as Snort® or Suricata.
NOTE: To import an events file from Snort or Suricata, you must first save the events from Snort as a Snort Fast log file, and save the events from Suricata as an EVE JSON file. The events in the events file must correspond to packets contained within the capture file.
• First Page/Last Page: Allows you to quickly go to the first or last page of the events.
• Messages by level of Severity: Displays the total number of events by each level of severity.
• Search: Allows you to search text displayed in the Event column. Separate multiple search terms with a white space, or the ‘AND,’ ‘OR,’ or ‘NOT’ (capitalized) operators. A white space is treated like the ‘AND’ operator.
• Select Date & Time Range: Allows you to search the events by date and time. You can specify both the start and end date and time. The clock icon is highlighted when a date and time range filter is in use. Click the clock icon again to remove the filter. When in use, mouse over the clock icon to display a tooltip of the date/time range filter.
• Event entries: Each event entry displays a severity of notification icon and the Date, Time, and Event.
• Right-click the log for the following options:
• Select Related Packets:Displays the Selection Results dialog. Click , , , , or . For more information, see Hiding and unhiding packets and Selecting related packets.
• Copy:Copies selected events to the clipboard as tab-delimited text.
• Copy Hyperlink: Copies selected hyperlinks to the clipboard.
• Open Hyperlink: Opens selected hyperlinks into tabs in your browser.
• Clear Events: Lets you clear the contents of the log.
• Auto Scroll:Toggles the Auto Scroll feature of the log.
• Highlight Search Terms: Lets you highlight search terms found in the log.